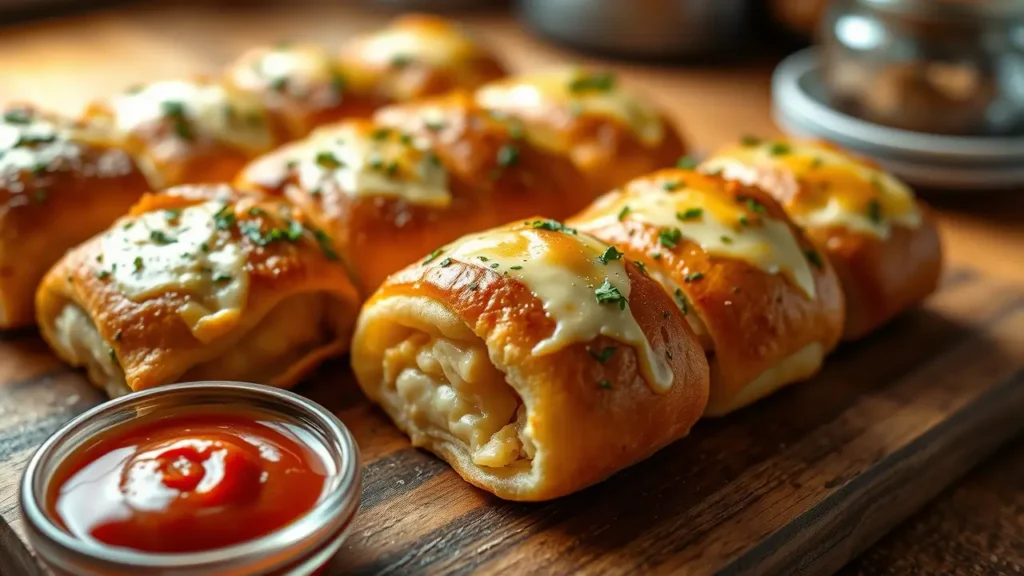
Cheesy Garlic Butter Rollups:5 Easy Ways To Customize It
There’s something truly magical about the combination of garlic, butter, and cheese — especially when it’s wrapped up in a golden, crispy shell. That’s what makes Cheesy Garlic Butter Rollups such a crowd-pleasing snack. Whether you’re whipping up a quick appetizer, a savory side for pasta, or a midnight comfort food snack, these rollups deliver flavor, crunch, and cheesy satisfaction in every bite.
In this article, we’ll show you how to make them step-by-step, explore different variations (including crescent dough and vegan-friendly versions), offer expert tips, and answer your most common questions. Let’s roll!
Ingredients You’ll Need For Cheesy Garlic Butter Rollups(with Quantities)
Here’s the basic ingredient list for classic bread-based Cheesy Garlic Butter Rollups:
For the Rollups:
- 8 slices of white sandwich bread (crusts removed)
- 1 cup shredded mozzarella cheese
- ½ cup shredded cheddar cheese (optional but adds flavor depth)
- 3 tablespoons unsalted butter (melted)
- 2 cloves garlic, finely minced
- 1 tablespoon fresh parsley, chopped (or 1 tsp dried parsley)
- Salt and black pepper to taste
Alternative Dough Options:
- 1 can (8 oz) refrigerated crescent roll dough
(for a puffier, flakier texture) - OR use 1 sheet of thawed puff pastry
- OR 1 batch of homemade or store-bought pizza dough
Optional Add-Ins:
- 1 tsp Italian seasoning
- ¼ tsp crushed red pepper flakes (for a spicy kick)
- Grated parmesan cheese for sprinkling
How to Make Cheesy Garlic Butter Rollups – Step-by-Step
1: Prep the Garlic Butter
In a small bowl, combine the melted butter, minced garlic, chopped parsley, and a pinch of salt and pepper. Mix well and set aside.
2: Flatten the Bread
Take your bread slices and flatten them with a rolling pin. Removing the crusts helps make rolling easier and ensures a smooth, sealed edge.
3: Add the Cheese
Sprinkle a generous amount of mozzarella (and optional cheddar) onto each slice. Leave a small margin around the edges so the cheese doesn’t spill out while baking.
4: Roll Them Up
Tightly roll each slice into a cylinder, sealing the edges with a dab of butter if needed. Place seam-side down on a baking tray lined with parchment paper.
5: Brush with Garlic Butter
Brush the tops and sides of the rollups with the garlic butter mixture. You can also sprinkle grated Parmesan or Italian seasoning for extra flavor.
6: Bake to Golden Perfection
Preheat your oven to 375°F (190°C). Bake for 12–15 minutes or until the rollups are golden and crispy. Keep an eye on them — the cheese should be bubbly and slightly caramelized.
Delicious Variations to Try
Crescent Dough Rollups
Use store-bought crescent dough for a buttery, flaky version. Just roll out the triangles, fill with cheese, and roll up as directed. Brush with garlic butter and bake for 15–18 minutes.
Puff Pastry Rollups
For a more elegant touch, use puff pastry cut into rectangles. These turn super crispy and make for an impressive party snack.
Vegan Cheesy Garlic Butter Rollups
- Replace cheese with dairy-free mozzarella
- Use vegan butter and a garlic substitute (if needed)
- Choose vegan-friendly sandwich bread or dough
Air Fryer Version
Perfect if you want to skip the oven:
- Preheat the air fryer to 350°F (175°C)
- Cook rollups for 8–10 minutes or until golden and crispy
- Don’t overcrowd the basket!
Serving Suggestions
Cheesy Garlic Butter Rollups are extremely versatile and go well with:
- Dipping Sauces: Marinara, garlic aioli, ranch, or spicy ketchup
- Soups: Tomato basil, cream of mushroom, or minestrone
- Salads: Caesar, mixed greens, or caprese
- Party Platters: Add alongside meatballs, sliders, or deviled eggs
Storage & Reheating Tips
- Storage: Place leftover rollups in an airtight container in the fridge for up to 3 days.
- Freezing: Freeze before baking. Store in zip-top bags with parchment between layers.
- Reheating: Reheat in the oven or air fryer at 350°F for 5–8 minutes. Avoid microwaving — it makes them soggy.
Frequently Asked Questions (FAQs)
1. Can I use pizza dough instead of bread?
Absolutely! Pizza dough makes a chewier, more doughy rollup. Just roll thin, add cheese, and bake at 400°F for 15 minutes.
2. How do I stop my rollups from getting soggy?
Don’t overfill with butter or cheese, and make sure the oven is fully preheated before baking. Cooling on a rack helps preserve crispiness.
3. What cheese is best for melting in rollups?
Mozzarella is the classic choice for meltiness, while cheddar and parmesan add flavor. You can also try Monterey Jack or provolone.
4. Can I freeze Cheesy Garlic Butter Rollups?
Yes, freeze them unbaked. When ready to cook, thaw slightly and bake as usual. They taste just as good!
5. How long should I bake rollups made with crescent dough?
Bake for about 15–18 minutes at 375°F. You’ll know they’re done when the tops are golden brown and the cheese is oozing.
6. What’s the difference between garlic knots and these rollups?
Garlic knots are typically made from twisted pizza dough, while rollups use flat bread or crescent dough and are filled before baking.
Common Mistakes to Avoid
- Overfilling: Too much cheese or butter will cause leakage and sogginess.
- Underbaking: If they’re too pale, the texture will be chewy, not crisp.
- Skipping the butter mix: The garlic-parsley-butter combo is what gives these their flavor punch!

Community Variations and Reader Twists
Some fun variations from social media include:
- Sweet-savory mashups: Add a drizzle of honey after baking!
- Stuffed options: Add cooked bacon bits or sautéed mushrooms
- Keto version: Use low-carb tortillas or fathead dough
Final Thoughts
Cheesy Garlic Butter Rollups are the snack that never disappoints. They’re quick to make, endlessly customizable, and ridiculously satisfying. Whether you’re hosting a dinner party or just want something indulgent for yourself, these rollups are your go-to. Try different cheeses, sprinkle herbs, or air fry for a crispy twist — the possibilities are endless.
Ready to roll?
Don’t forget to explore dishes like birria tacos